Add certificates
YugabyteDB Anywhere allows you to add an encryption in transit configuration using HashiCorp Vault with a public key infrastructure (PKI) secret engine. This configuration can be used to enable TLS for different clusters and YugabyteDB instances. You can apply this configuration to node-to-node encryption, client-to-node encryption, or both.
Prerequisites
For the correct configuration, the following criteria must be met:
- HashiCorp Vault is unsealed.
- HashiCorp Vault with the PKI secret engine is configured and enabled.
- HashiCorp Vault URL is accessible by YugabyteDB Anywhere.
- Because HashiCorp Vault is accessed via an authentication token mechanism, a token must be created beforehand while creating a key provider with appropriate permissions.
- HashiCorp Vault needs to be running and always accessible to YugabyteDB Anywhere.
- HashiCorp PKI certificate revocation list (CRL) or CA URLs must be accessible from each node server.
- Appropriate certificates and roles have been created for YugabyteDB Anywhere usage.
- Node servers are able to validate certificates.
- Required permissions have been provided to perform various key management operations.
Configure HashiCorp Vault
Before you can start configuring HashiCorp Vault, install it on a virtual machine, as per instructions provided in Install Vault. The vault can be set up as a multi-node cluster. Ensure that your vault installation meets the following requirements:
- Has transit secret engine enabled.
- Its seal and unseal mechanism is secure and repeatable.
- Its token creation mechanism is repeatable.
You need to configure HashiCorp Vault in order to use it with YugabyteDB Anywhere, as follows:
-
Create a vault configuration file that references your nodes and specifies the address, as follows:
storage "raft" {
path  = "./vault/data/"
node_id = "node1"
}

listener "tcp" {
address   = "127.0.0.1:8200"
tls_disable = "true"
}

api_addr = "http://127.0.0.1:8200"
cluster_addr = "https://127.0.0.1:8201"
ui = true
disable_mlock = true
default_lease_ttl = "768h"
max_lease_ttl = "8760h"
Replace
127.0.0.1with the vault web address.For additional configuration options, see Parameters.
-
Initialize the vault server by following instructions provided in Operator init.
-
Allow access to the vault by following instructions provided in Unsealing.
-
Enable the secret engine by executing the following command:
vault secrets enable pki -
Configure the secret engine, as follows:
-
Create a root CA or configure the top-level CA.
-
Optionally, create an intermediate CA chain and sign them.
-
Create an intermediate CA for YugabyteDB, as per the following example:
export pki=pki
export pki_int="pki_int"
export role_i=RoleName
export ip="s.test.com"

vault secrets enable -path=$pki_int pki
vault secrets tune -max-lease-ttl=43800h $pki_int
vault write $pki_int/intermediate/generate/internal common_name="test.com Intermediate Authority" ttl=43800h -format=json | jq -r '.data.csr' > pki_int.csr

\# *** dump the output of the preceding command in pki_int.csr

vault write $pki/root/sign-intermediate csr=@pki_int.csr format=pem_bundle ttl=43800h -format=json | jq -r .data.certificate > i_signed.pem

\# *** dump the output in i_signed.pem

vault write $pki_int/intermediate/set-signed certificate=@i_signed.pem
vault write $pki_int/config/urls issuing_certificates="http://127.0.0.1:8200/v1/pki_int/ca" crl_distribution_points="http://127.0.0.1:8200/v1/pki_int/crl"
-
-
Create the vault policy, as per the following example:
# Enable secrets engine path "sys/mounts/*" { capabilities = ["create", "read", "update", "delete", "list"] } # List enabled secrets engine path "sys/mounts" { capabilities = ["read", "list"] } # Work with pki secrets engine path "pki*" { capabilities = ["create", "read", "update", "delete", "list", "sudo"] } -
Generate a token with appropriate permissions (as per the referenced policy) by executing the following command:
vault token create -no-default-policy -policy=pki_policyYou may also specify the following for your token:
ttl— Time to live (TTL). If not specified, the default TTL of 32 days is used, which means that the generated token will expire after 32 days.period— If specified, the token can be infinitely renewed.
YugabyteDB Anywhere automatically tries to renew the token every 12 hours after it has passed 70% of its expiry window; as a result, you should set the TTL or period to be greater than 12 hours.
For more information, refer to Tokens in the Hashicorp documentation.
-
Create a role that maps a name in the vault to a procedure for generating a certificate, as follows:
vault write <PKI_MOUNT_PATH>/roles/<ROLE_NAME> allow_any_name=true allow_subdomains=true max_ttl="8640h"Credentials are generated against this role.
-
Issue certificates for nodes or a YugabyteDB client:
-
For a node, execute the following:
vault write <PKI_MOUNT_PATH>/issue/<ROLE_NAME> common_name="<NODE_IP_ADDR>" ip_sans="<NODE_IP_ADDR>" ttl="860h" -
For YugabyteDB client, execute the following:
vault write <PKI_MOUNT_PATH>/issue/<ROLE_NAME> common_name="<CLIENT_DB_USER>"
-
Add HashiCorp Vault-provided certificates
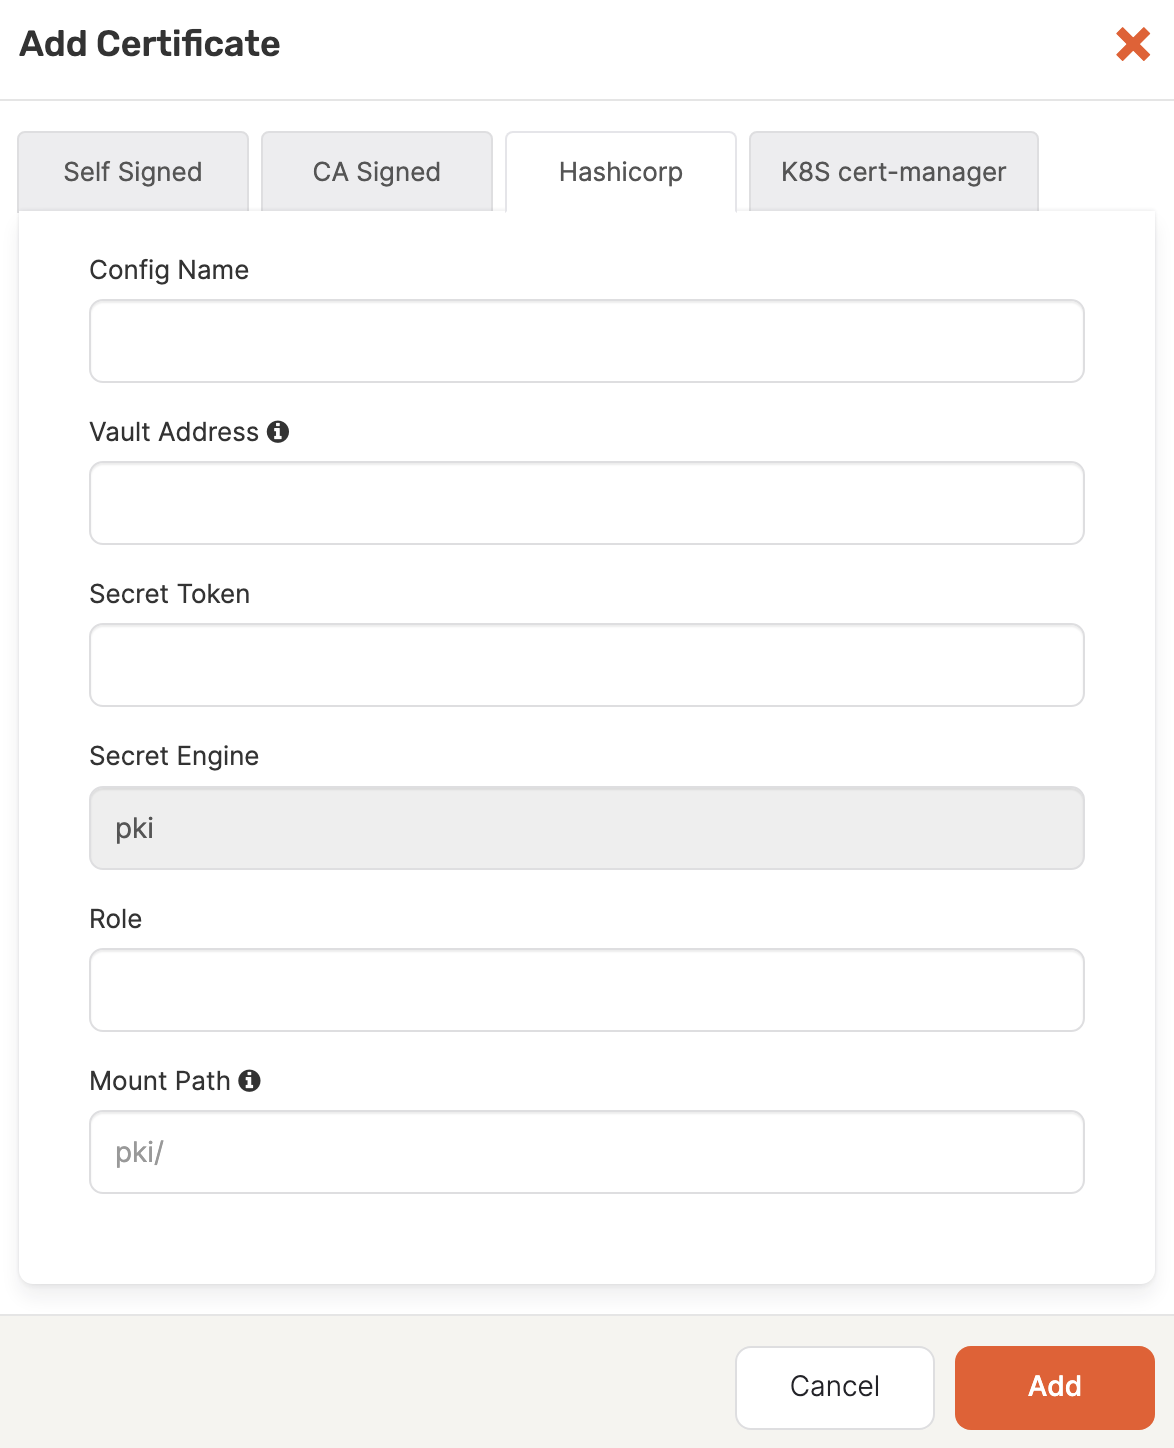
When you create a universe, you can enable TLS using certificates provided by HashiCorp Vault, as follows:
-
Navigate to Integrations > Security > Encryption in Transit.
-
Click Add Certificate to open the Add Certificate dialog.
-
Select Hashicorp.

-
In the Config Name field, enter a meaningful name for your configuration.
-
In the Vault Address field, specify a valid URL that includes the port number. The format is
http://0.0.0.0:0000, which corresponds toVAULT_HOSTNAME:0000 -
In the Secret Token field, specify the secret token for the vault.
-
In the Role field, specify the role used for creating certificates.
-
Optionally, provide the secret engine path on which the PKI is mounted. If you do not supply this information,
pki/will be used. -
Click Add to make the certificate available.