Build a Spark application using Spark SQL and YugabyteDB
The following tutorial describes how to use Spark SQL with YugabyteDB, and perform YSQL queries.
Prerequisites
This tutorial assumes that you have:
- YugabyteDB running. If you are new to YugabyteDB, follow the steps in Quick start.
- Java Development Kit (JDK) 1.8. JDK installers for Linux and macOS can be downloaded from OpenJDK, AdoptOpenJDK, or Azul Systems. Homebrew users on macOS can install using
brew install AdoptOpenJDK/openjdk/adoptopenjdk8. - Apache Spark 3.3.0.
Start Spark SQL shell with YugabyteDB driver
From your Spark installation directory, use the following command to start spark-sql, and pass the YugabyteDB driver package with the --packages parameter. The command fetches the YugabyteDB driver from local cache (if present), or installs the driver from maven central.
./bin/spark-sql --packages com.yugabyte:jdbc-yugabytedb:42.7.3-yb-1
The Spark prompt should be available as spark-sql>.
Set up the database
Create the database and table you will read and write to as follows:
-
From your YugabyteDB installation directory, use ysqlsh shell to read and write directly to the database as follows:
./bin/ysqlsh -
Create a database for
spark-sqland connect to it using the following:yugabyte=# CREATE DATABASE ysql_spark_sql; yugabyte=# \c ysql_spark_sql;You are now connected to database "ysql_spark_sql" as user "yugabyte". ysql_spark_sql=# -
Create a table in the
ysql_spark_sqldatabase to read and write data through the JDBC connector fromspark-sqlas follows:ysql_spark_sql=# CREATE TABLE test AS SELECT generate_series(1,100000) AS id, random(), ceil(random() * 20);
Store and retrieve data
-
Create a table
test_refin thespark-sqlshell, referencing the tabletestthrough the configuration properties using the JDBC connector:spark-sql> CREATE TABLE test_ref USING org.apache.spark.sql.jdbc OPTIONS ( url "jdbc:yugabytedb://localhost:5433/ysql_spark_sql", dbtable "test", user "yugabyte", password "yugabyte", driver "com.yugabyte.Driver" );
You can now read and write data through the table test_ref.
-
Run the following commands to fetch some data:
spark-sql> SELECT ceil, sum(id) FROM test_ref GROUP BY ceil LIMIT 10;8.0 498169906 7.0 508260550 18.0 501050266 1.0 501584522 4.0 492761124 11.0 507580062 14.0 518283840 3.0 486508876 19.0 497964478 2.0 505807396spark-sql> SELECT COUNT(*) FROM test_ref;100000 -
Insert data with the
INSERTcommand as follows:spark-sql> INSERT INTO test_ref VALUES(1234543,0.951123432168208551,22.0); -
Append all the data to
test_reftable from the same table as follows:spark-sql> INSERT INTO test_ref SELECT * FROM test_ref; -
Verify that the data is inserted as follows:
spark-sql> SELECT COUNT(*) from test_ref;200002
Parallelism
To maintain parallelism while fetching the table content, create a DataFrame for the table test with some specific options as follows:
spark-sql> CREATE TABLE test_partitions USING org.apache.spark.sql.jdbc OPTIONS (
                    url "jdbc:yugabytedb://localhost:5433/ysql_spark_sql",
                    dbtable "test",
                    user "yugabyte",
                    password "yugabyte",
                    driver "com.yugabyte.Driver",
                    numPartitions 5,
                    partitionColumn "ceil",
                    lowerBound 0,
                    upperBound 20) ;
spark-sql> SELECT SUM(ceil) FROM test_partitions WHERE id > 50000;
+---------+
|sum(ceil)|
+---------+
|1045214.0|
+---------+
The options used in the example help in breaking down the whole task into numPartitions parallel tasks on the basis of the partitionColumn, with the help of minimum and maximum value of the column; where,
numPartitions- divides the whole task tonumPartitionsparallel tasks.lowerBound- minimum value of thepartitionColumnin a table.upperBound- maximum value of thepartitionColumnin a table.partitionColumn- the column on the basis of which a partition occurs.
Verify parallelism
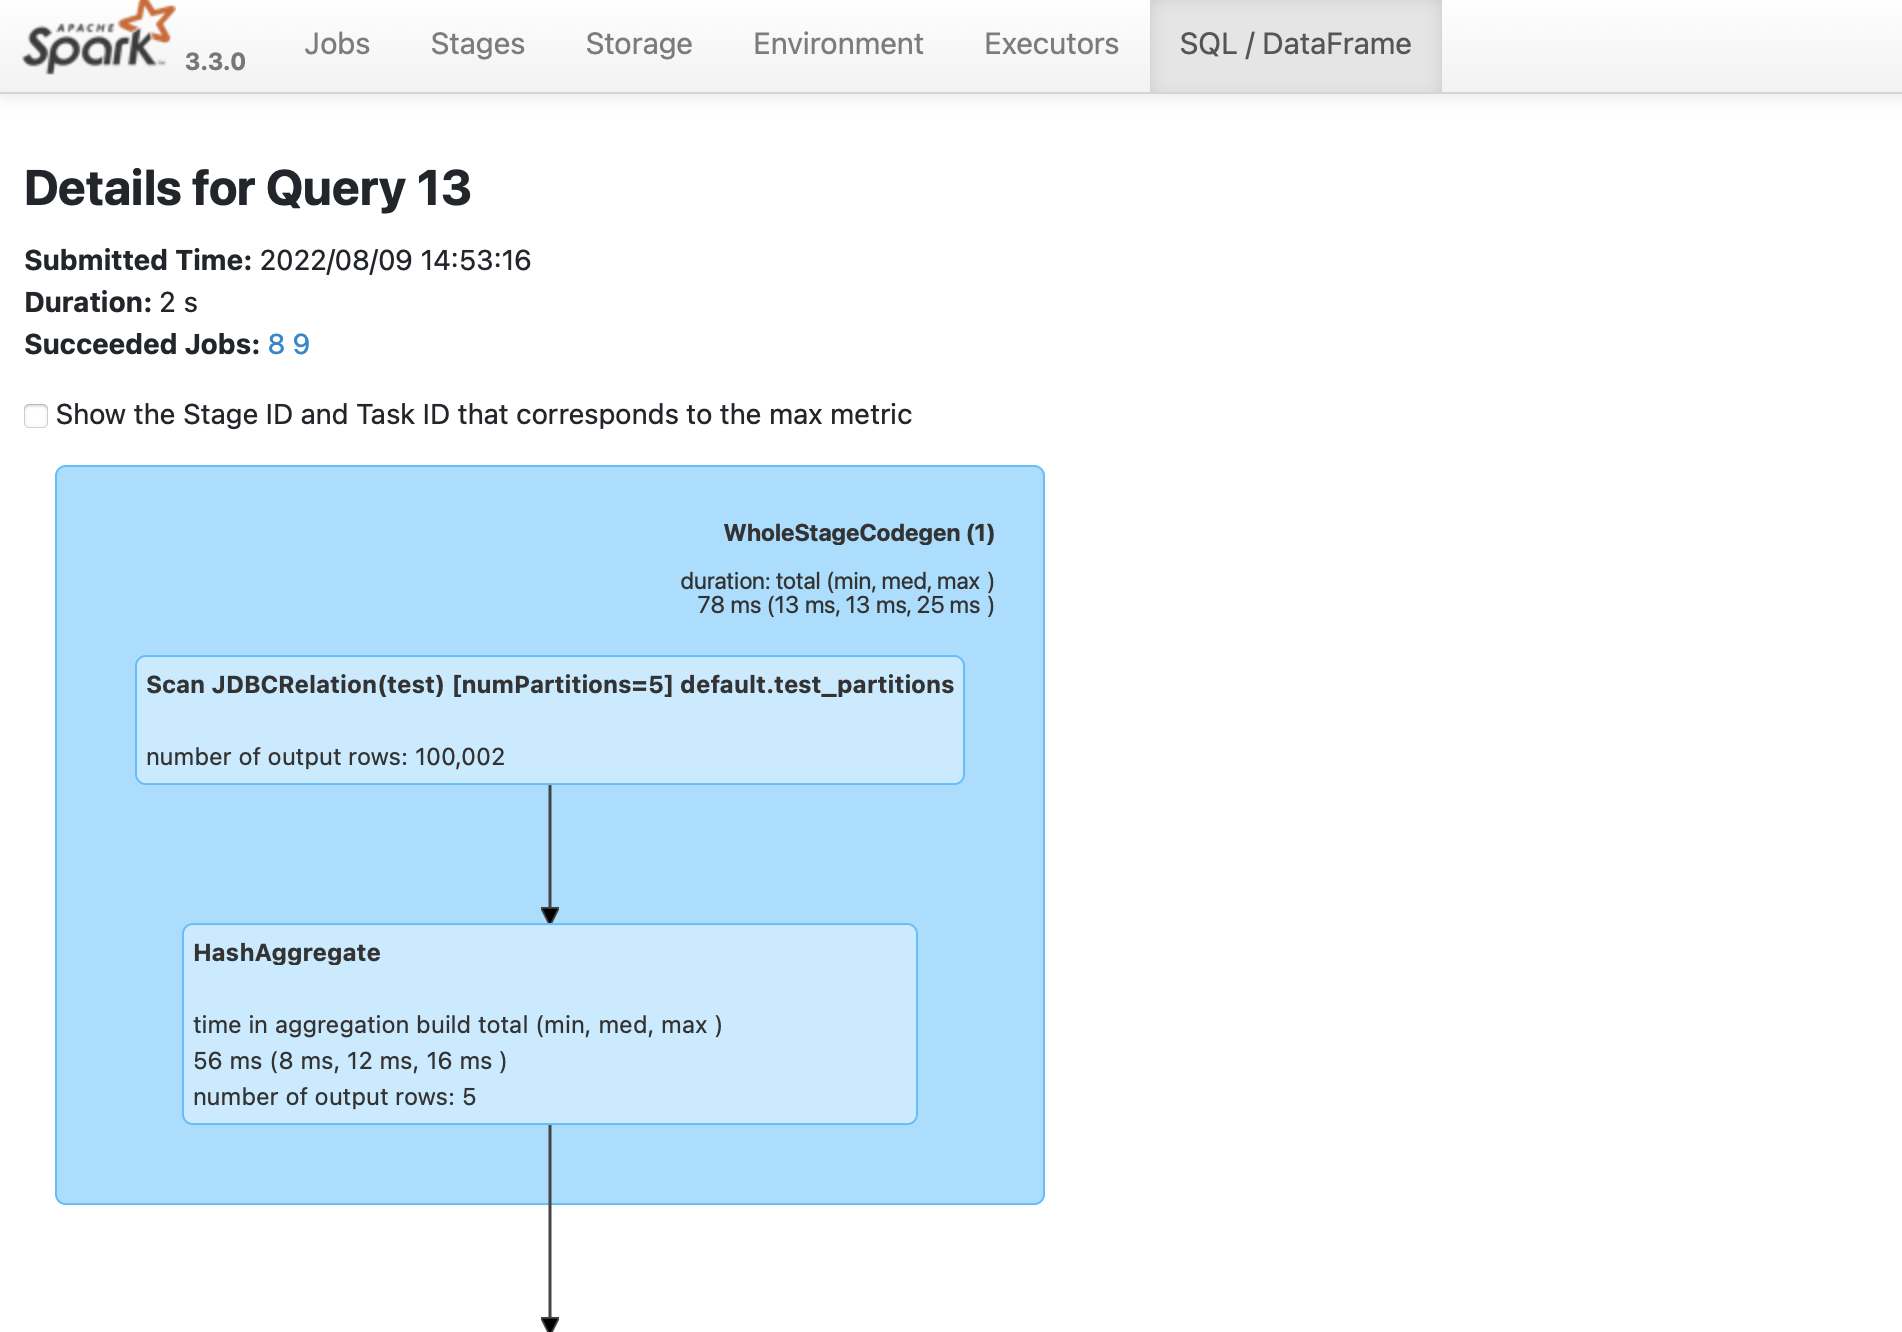
To verify that the Spark job is created,
-
Navigate to the Spark UI using https://localhost:4040. If your port 4040 is in use, then change the port to the one mentioned when you started the
spark-sqlshell. -
From the SQL/DataFrame tab, click the last executed SQL statement to see if
numPartitions=5is displayed as shown in the following image: